Autoware.AI

MapToolbox
一 环境搭建
1 安装 CUDA 10.0
Step 1 : revmoe nvidia
sudo apt-get remove --purge nvidia*
Step 2 : Install cuda 10.0
下载链接: cuda-repo-ubuntu1804_10.0.130-1_amd64.deb
## Install cuda
## https://developer.nvidia.com/cuda-toolkit-archive
sudo dpkg -i cuda-repo-ubuntu1804_10.0.130-1_amd64.deb
sudo apt-key adv --fetch-keys http://developer.download.nvidia.com/compute/cuda/repos/ubuntu1804/x86_64/7fa2af80.pub
sudo apt-get update
sudo apt-get install cuda-10-0
Step 3 : Install cuDNN
先下载 cuDNN v7.5.0 (Feb 21, 2019), for CUDA 10.0 ; 需要注册账号登录才能下载.
## https://developer.nvidia.com/rdp/cudnn-archive
## cuDNN v7.5.0 (Feb 21, 2019), for CUDA 10.0

sudo dpkg -i libcudnn7_7.5.0.56-1+cuda10.0_amd64.deb
Step 4 : 添加环境变量
在 ${HOME}/.bash_aliases 添加
##################################
#  CUDA
##################################
export CUDA_HOME=/usr/local/cuda-10.0
export PATH=$PATH:$CUDA_HOME/bin
export LD_LIBRARY_PATH=${CUDA_HOME}/lib64${LD_LIBRARY_PATH:+:${LD_LIBRARY_PATH}}
source ${HOME}/.bash_aliases # 查看 CUDA 版本 nvcc -V
Step 5 : 重启系统
sudo shutdown -r now
2 安装 ROS melodic
2.1 更新 ROS源地址
# # 更换阿里源, 网速快; 缺点, 当碰巧,阿里源正在和官方源同步的时段,会无法安装
# sed -i 's/cn.archive.ubuntu.com/mirrors.aliyun.com/' /etc/apt/sources.list # X86 中文
# sed -i 's/archive.ubuntu.com/mirrors.aliyun.com/' /etc/apt/sources.list    # X86 英文
# sed -i 's/ports.ubuntu.com/mirrors.aliyun.com/' /etc/apt/sources.list      # arm

#  添加 科大ROS源
sudo sh -c '. /etc/lsb-release && echo "deb http://mirrors.ustc.edu.cn/ros/ubuntu/ $DISTRIB_CODENAME main" > /etc/apt/sources.list.d/ros-latest.list'

sudo apt-key adv --keyserver keyserver.ubuntu.com --recv-keys F42ED6FBAB17C654
sudo apt-get update
2.2 安装 ROS
- 执行安装脚本
# 按照提示输入,当前用户密码
# x86_64
wget -qO - https://raw.githubusercontent.com/my-rds-store/my_space/master/source/autoware/src/ros_instal.sh | bash
wget -qO - https://raw.fastgit.org/my-rds-store/my_space/master/source/autoware/src/ros_instal.sh | bash

# Arm - Nvidia Jetson AGX
wget -qO - https://github.com/my-rds-store/my_space/raw/master/source/autoware/src/ros_install_agx.sh | bash
wget -qO - https://raw.fastgit.org/my-rds-store/my_space/master/source/autoware/src/ros_install_agx.sh
x86_64安装脚本的源码如下:
##############################
# Install ROS  melodic
##############################

sudo tee /etc/resolv.conf <<-'EOF'
nameserver 114.114.114.114
nameserver 8.8.8.8
EOF

sudo apt install libc6:i386 --yes --allow-unauthenticated
#sudo apt-get install cuda-10-0

sudo apt-get install openssh-server vim --yes --allow-unauthenticated
sudo apt-get install python3-pip --yes --allow-unauthenticated
sudo apt-get install ros-melodic-desktop-full --yes --allow-unauthenticated
sudo apt-get install ros-melodic-desktop-full --yes --allow-unauthenticated --fix-missing

sudo apt-get install ros-melodic-rosbash ros-melodic-rosbash-params --yes --allow-unauthenticated

tee ${HOME}/.bash_aliases <<-'EOF'
##################################
#  CUDA
##################################
export CUDA_HOME=/usr/local/cuda-10.0
export PATH=$PATH:$CUDA_HOME/bin
export LD_LIBRARY_PATH=${CUDA_HOME}/lib64${LD_LIBRARY_PATH:+:${LD_LIBRARY_PATH}}

export CPLUS_INCLUDE_PATH=/usr/local/include/eigen3:${CPLUS_INCLUDE_PATH}  # autoware : --- stderr: glviewer

source /opt/ros/melodic/setup.bash
rosclean purge -y
EOF
source /opt/ros/melodic/setup.bash


sudo apt-get install python-rosinstall \
                     python-rosinstall-generator \
                     python-wstool \
                     build-essential --yes --allow-unauthenticated


sudo apt install -y python-catkin-pkg python-rosdep ros-$ROS_DISTRO-catkin
sudo apt install -y python3-pip python3-colcon-common-extensions python3-setuptools python3-vcstool

##############
sudo tee /etc/resolv.conf <<-'EOF'
nameserver 8.8.8.8
nameserver 114.114.114.114
EOF

sudo rosdep init
rosdep update

##############
sudo tee /etc/resolv.conf <<-'EOF'
nameserver 114.114.114.114
nameserver 8.8.8.8
EOF


sudo apt-get install libarmadillo-dev libglew-dev libssh2-1-dev python-flask python-requests wget --yes --allow-unauthenticated

######## pip
mkdir ${HOME}/.pip
sudo tee ${HOME}/.pip/pip.conf <<-'EOF'
[global]
index-url = https://mirrors.aliyun.com/pypi/simple/

#(legacy|columns)
format = columns

[install]
trusted-host=mirrors.aliyun.com
EOF

#######
sudo apt-get install vim openssh-server --yes --allow-unauthenticated


# #sudo apt-get install nvidia-docker2
# sudo apt-get install curl --yes --allow-unauthenticated
# sudo apt-get install chromium-browser --yes --allow-unauthenticated

sudo apt-get install libsdl1.2-dev --yes --allow-unauthenticated

#
# #sudo apt-get install aptitude
# #sudo aptitude install  ros-melodic-desktop-full --yes --allow-unauthenticated
3 源码编译 Autoware
- step 1 : Install Eigen (线性算术的C++模板库)
- 主页
#wget http://bitbucket.org/eigen/eigen/get/3.3.7.tar.gz #Download Eigen 失效
wget -O 3.3.7.tar.gz https://gitlab.com/libeigen/eigen/-/archive/3.3.7/eigen-3.3.7.tar.gz

mkdir eigen && tar --strip-components=1 -xzvf 3.3.7.tar.gz -C eigen #Decompress

cd eigen && mkdir build && cd build && cmake .. && make && sudo make install #Build and install

cd ../../ && rm -rf 3.3.7.tar.gz && rm -rf eigen #Remove downloaded and temporary files
- step 2 : Build Autoware
注意
NVIDIA Jetson AGX Xavier
    需要 将libopencv-dev 版本
    由 4.1.1-2-gd5a58aa75 降为 3.2.0+dfsg-4ubuntu0.1

    sudo apt-get install libopencv-dev=3.2.0+dfsg-4ubuntu0.1
- build autoware 1.13.0 on NVIDIA Jetson AGX Xavier
cd vendor/mrt_cmake_modules
git checkout 9ddefc0
mkdir -p autoware.ai/src
cd autoware.ai


# Download 1.14.0
wget https://raw.fastgit.org/Autoware-AI/autoware.ai/1.14.0/autoware.ai.repos
sed -i "s/github.com/hub.fastgit.org/" autoware.ai.repos

# 使用官方 lanelet2
# sudo apt-get install  ros-melodic-lanelet2

# Download master
wget -O autoware.ai.repos "https://raw.githubusercontent.com/Autoware-AI/autoware.ai/master/autoware.ai.repos"

vcs import src < autoware.ai.repos

## Install dependencies using rosdep.
rosdep update # 如遇失败, 需登梯子,原因不解释

# 或者执行,也可以
wget -qO - https://raw.fastgit.org/my-rds-store/my_space/master/source/ros/shell/rosdep_repair.sh | bash

rosdep update


rosdep install -y --from-paths src --ignore-src --rosdistro $ROS_DISTRO

# Without CUDA Support
colcon build --cmake-args -DCMAKE_BUILD_TYPE=Release

# With CUDA support
AUTOWARE_COMPILE_WITH_CUDA=1 colcon build --cmake-args -DCMAKE_BUILD_TYPE=Release

# With CUDA support build gnss_localizer only
# AUTOWARE_COMPILE_WITH_CUDA=1 colcon build --packages-up-to gnss_localizer \
#                                --cmake-args -DCMAKE_BUILD_TYPE=Release
- step 2 : Run Autoware
cd autoware.ai
source install/setup.bash
roslaunch runtime_manager runtime_manager.launch
- lidar_apollo_cnn_seg_detect
#参考: https://www.cnblogs.com/hgl0417/p/12114955.html

sudo apt install -y libprotobuf-dev libleveldb-dev libsnappy-dev libopencv-dev libhdf5-serial-dev protobuf-compiler
sudo apt install -y --no-install-recommends libboost-all-dev
sudo apt install -y libopenblas-dev #libatlas-base-dev
sudo apt install -y libgflags-dev libgoogle-glog-dev liblmdb-dev

git clone --depth 1 https://hub.fastgit.org/BVLC/caffe.git $HOME/caffe

URL_PATH=https://raw.fastgit.org/my-rds-store/my_space/master/source/autoware/src/caffe
wget -O $HOME/caffe/Makefile.config  $URL_PATH/Makefile.config

# for arm  plantform
set -i "s/x86_64/aarch64/" $HOME/caffe/Makefile.config

cd  $HOME/caffe; make &&  make distribute


tee ${HOME}/.bash_aliases <<-'EOF'
export LD_LIBRARY_PATH=$HOME/caffe/distribute/lib:$LD_LIBRARY_PATH
export APOLLO_CNNSEG=/home/promote/Autoware/APOLLO_CNNSEG
EOF

# lidar_apollo_cnn_seg_detect patch
cd ${HOME}/Autoware/src/autoware/core_perception/lidar_apollo_cnn_seg_detect
wget -O lidar_apollo_cnn_seg_detect.patch ${URL_PATH}/lidar_apollo_cnn_seg_detect.patch
git apply lidar_apollo_cnn_seg_detect.patch

#下载 APOLLO_CNNSEG
#https://github.com/ApolloAuto/apollo/tree/master/modules/perception/production/data/perception/lidar/models/cnnseg
#https://hub.fastgit.org/ApolloAuto/apollo/tree/master/modules/perception/production/data/perception/lidar/models/cnnseg
4. Autoware Docker 镜像
 git clone -b 1.14.0 https://github.com/Autoware-AI/docker.git

 cd docker/generic

 mkdir ${HOME}/shared_dir

./run.sh --ros-distro melodic            # 有 nvidia cuda支持
./run.sh --ros-distro melodic --cuda off # 无 nvidia cuda支持
# root 用户下
xhost +
# for armv8
docker pull autoware/arm64v8:1.14.0-melodic
5. 学习资料
二 Gazebo Simulation
三 CARLA Simulator
# 0.9.10 depends
pip install --user pygame numpy

python -m pip install pygame==2.0.1 # 0.9.10.1


#export CARLA_ROOT=${HOME}/shared_dir/carla
#export PYTHONPATH=${PYTHONPATH}:${CARLA_ROOT}/PythonAPI/carla/dist/carla-0.9.10-py2.7-linux-x86_64.egg
#export PYTHONPATH=$PYTHONPATH:${CARLA_ROOT}/PythonAPI/carla

#export CARLA_AUTOWARE_CONTENTS=${HOME}/work2/carla/linux/carla-autoware/autoware-contents


# 安装 carla
mkdir carla
tar xzvf CARLA_0.9.10.1.tar.gz  -c carla
mv AdditionalMaps_0.9.10.1.tar.gz ./carla/Import/

# 导入 AdditionalMaps
cd carla
./ImportAssets.sh
ros-bridge
git clone -b 0.9.10.1  https://github.com/carla-simulator/ros-bridge.git --recursive
# cd ros-bridge
# git submodule update --init --recursive

# install depends
sudo apt-get install ros-melodic-ackermann-msgs ros-melodic-derived-object-msgs
roslaunch carla_ros_bridge carla_ros_bridge_with_example_ego_vehicle.launch \
    host:=192.168.8.6 town:=Town03 vehicle_filter:=vehicle.toyota.prius  \
    spawn_point:="0.700499,-189.727951,0.2,0,0.000000,-91.413536"
carla-autoware
SDL_VIDEODRIVER=offscreen ./CarlaUE4.sh -opengl

roslaunch carla_autoware_agent carla_autoware_agent.launch town:=Town03 host:=192.168.8.6
四 LGSVL Simulator
# ubuntu18.04 Install lgsvls imulator
sudo apt install libcanberra-gtk-module libcanberra-gtk3-module # Failed to load module "canberra-gtk-module"
sudo apt-get install libgtk2.0-0:i386 libglib2.0-0:i386 libgdk-pixbuf2.0-0:i386 # 待验证
sudo apt-get install vulkan-utils # 解决: No supported renderes found, exiting
##
${HOME}/.config/unity3d/LG\ Silicon\ Valley\ Lab/LGSVL\ Simulator
${HOME}/.config/unity3d/LGElectronics/SVLSimulator-2021.3
Windows LGSVL地图及配置文件,下载保存路径为

2020早期版本
        %userprofile%\AppData\Locallow\LG Silicon Valley Lab\LGSVL Simulator\

2021版本
        %userprofile%\AppData\locallow\LGElectronics
cp -rvf  ./src/autoware/simulation/lgsvl_simulator_bridge/*  \
         ./install/lgsvl_simulator_bridge/share/lgsvl_simulator_bridge/
source install/setup.bash
roslaunch runtime_manager runtime_manager.launch

# start
roslaunch rosbridge_server rosbridge_websocket.launch

# nvidia  jetson AGX  Xavier  depend
sudo apt-get install python-bson python-tornado
五 学习笔记
使用GNSS进行定位
gnss_localizer
https://github.com/autowarefoundation/autoware/issues/492
find . -name "*.py" -or -name "*.yaml"| xargs grep -in plane
find . -name "*.c*" -or -name "*.h*" -or -name "*.launch" -or -name "*.py" | xargs grep -in set_plane

vim ./autoware/utilities/runtime_manager/scripts/computing.yaml +1281
vim ./autoware/utilities/autoware_launcher/plugins/refs/nmea2tfpose.yaml +11

vim ./autoware/core_perception/gnss_localizer/launch/fix2tfpose.launch +4
vim ./autoware/core_perception/gnss_localizer/nodes/nmea2tfpose/nmea2tfpose_core.cpp +46

vim ./autoware/common/gnss/src/geo_pos_conv.cpp +52
路径跟踪基本配置
<!-- lgsvl-tf.launch -->

<launch>
<node pkg="tf"  type="static_transform_publisher" name="world_to_map" args="0 0 0 0 0 0 /world /map 10" />
<node pkg="tf"  type="static_transform_publisher" name="map_to_mobility" args="0 0 0 0 0 0 /map /mobility 10" />
</launch>
Autoware Camera-LiDAR Calibration Package
- Autoware Camera-LiDAR Calibration
- 节点拓扑图 待整理
# calibration_publisher

CALIBRATION=$(pwd)/calibration/autoware_lidar_camera_calibration.yaml

roslaunch runtime_manager calibration_publisher.launch target_frame:=velodyne camera_frame:=camera file:=${CALIBRATION} \
register_lidar2camera_tf:=True publish_extrinsic_mat:=True publish_camera_info:=True \
camera_info_topic:=/camera_info2  \
image_topic_src:=/image_raw  \
projection_matrix_topic:=/projection_matrix  \
camera_id:=/cv_camera


# points2image
roslaunch runtime_manager  points2image.launch  camera_id:=/cv_camera camera_info_src:=/camera_info2

#######################################################################
#
# rosrun topic_tools relay /cv_camera/image_raw /image_raw

#CALIBRATION=$(pwd)/calibration/autoware_lidar_camera_calibration.yaml
#roslaunch runtime_manager calibration_publisher.launch target_frame:=velodyne camera_frame:=camera file:=${CALIBRATION}  \
#        register_lidar2camera_tf:=True publish_extrinsic_mat:=True publish_camera_info:=True \
#        camera_info_topic:=/camera_info  \
#        image_topic_src:=/image_raw       \
#        projection_matrix_topic:=/projection_matrix camera_id:=/

# #points2image
#roslaunch runtime_manager  points2image.launch  camera_id:=/ camera_info_src:=camera_info
Traffic Light Recognition
使用YOLOv3进行检测
Step 2: usb_cam
sudo apt install v4l-utils

v4l2-ctl --list-devices

###

sudo apt install ros-melodic-cv-camera

rosparam set cv_camera/device_id 2

rosrun cv_camera cv_camera_node

rostopic echo /cv_camera/image_raw
mkdir -p usb_cam
cd usb_cam

#git clone https://github.com/bosch-ros-pkg/usb_cam src
git clone https://github.com/ros-drivers/usb_cam.git src

catkin_make
source devel/setup.bash

roscore  &
source devel/setup.bash
roslaunch usb_cam usb_cam-test.launch
Step 3
- Computing->Detection->vision_detector->vision_darknet_yolo3/[app]
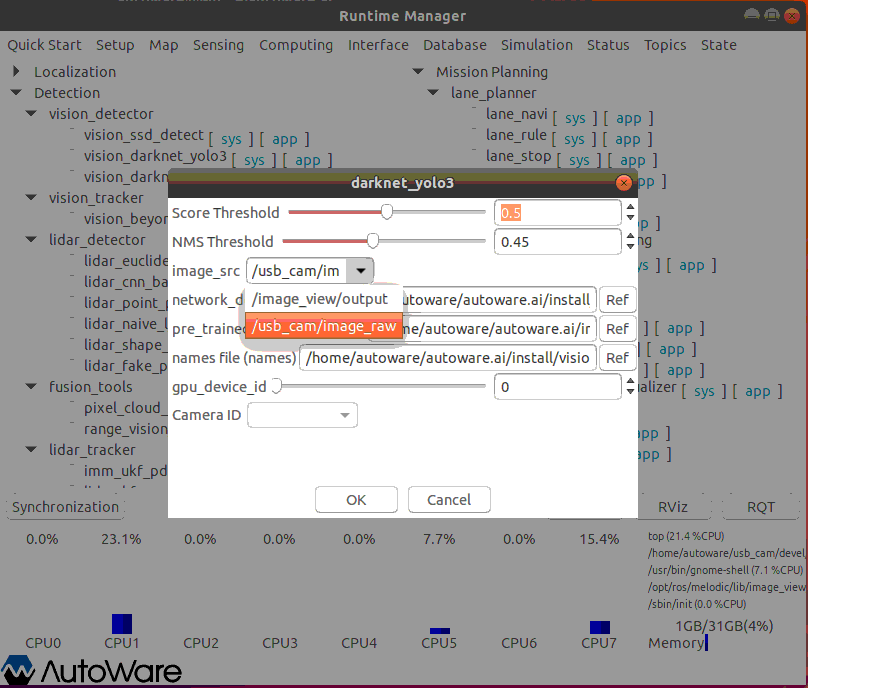
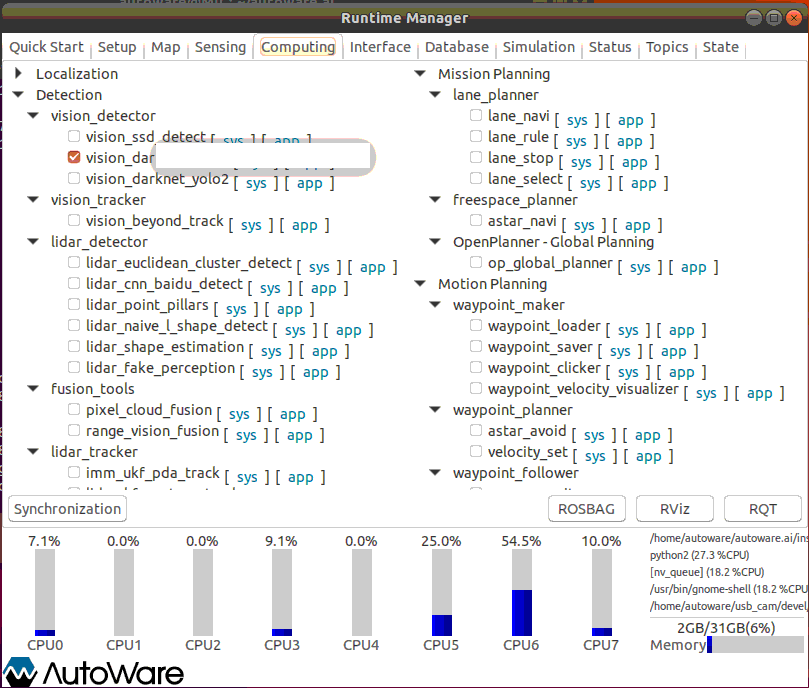
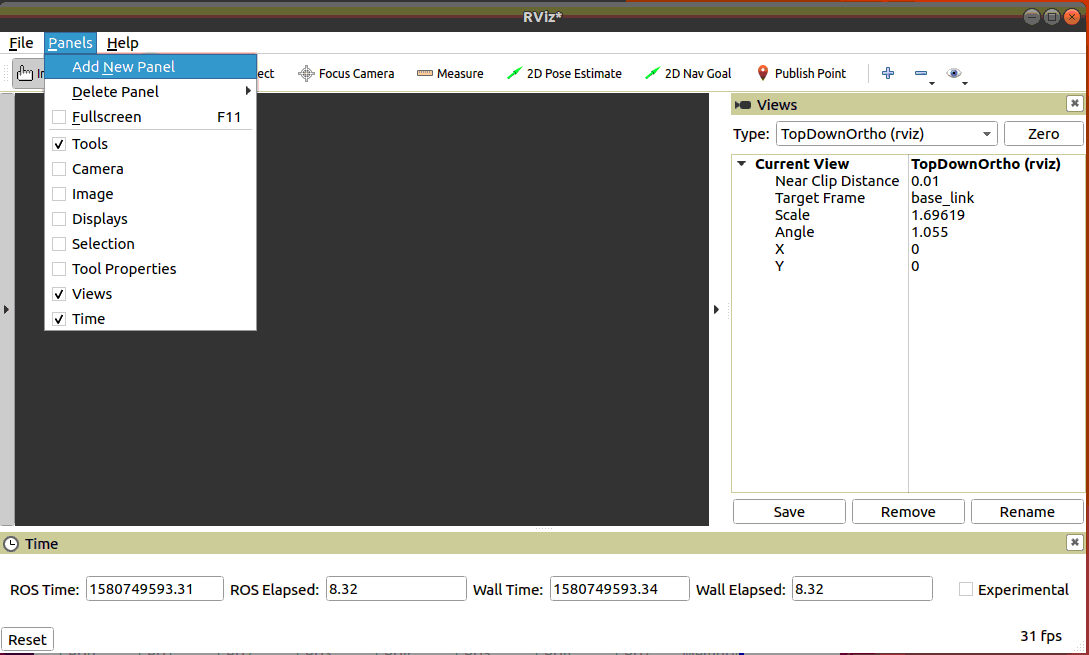
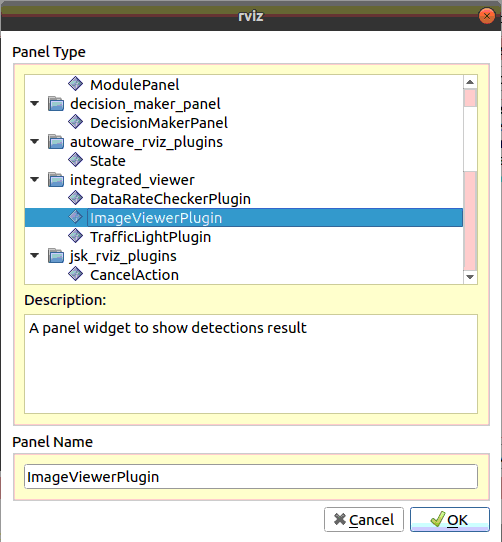
- 打卡 Rviz
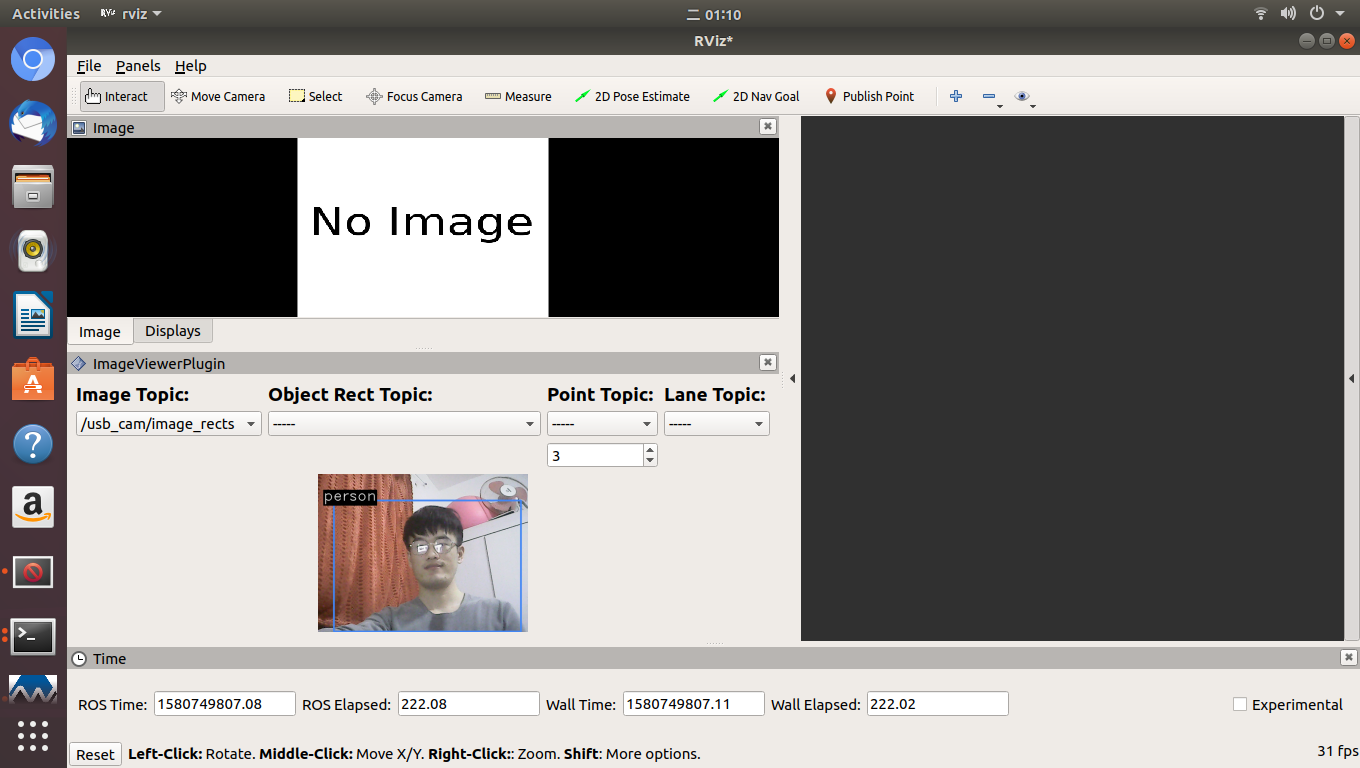
- How to use object detection package in Autoware
$ git diff

diff --git a/rslidar_pointcloud/launch/cloud_nodelet.launch b/rslidar_pointcloud/launch/cloud_nodelet.launch
index 6f0869a..a3ef4e9 100644
--- a/rslidar_pointcloud/launch/cloud_nodelet.launch
+++ b/rslidar_pointcloud/launch/cloud_nodelet.launch
@@ -15,6 +15,9 @@
     <param name="device_ip" value="$(arg device_ip)" />
     <param name="msop_port" value="$(arg msop_port)" />
     <param name="difop_port" value="$(arg difop_port)"/>
+
+    <!-- support autoware  -->
+    <param name="frame_id" type="string" value="velodyne"/>
   </node>

   <node pkg="nodelet" type="nodelet" name="$(arg manager)_cloud"
@@ -24,5 +27,7 @@
     <param name="angle_path" value="$(find rslidar_pointcloud)/data/rs_lidar_16/angle.csv" />
     <param name="channel_path" value="$(find rslidar_pointcloud)/data/rs_lidar_16/ChannelNum.csv" />

+       <!-- support autoware  -->
+       <remap from="rslidar_points" to="/points_raw"/>
   </node>
 </launch>
rostopic echo /points_raw | grep frame_id
问题记录
op_behavior_selector 状态及 END 状态
- 问题分析
// autoware/common/op_planner/src/DecisionMaker.cpp + 148

void DecisionMaker::CalculateImportantParameterForDecisionMaking(const PlannerHNS::VehicleState& car_state,
 const int& goalID, const bool& bEmergencyStop, const std::vector<TrafficLight>& detectedLights,
 const TrajectoryCost& bestTrajectory)
{

    // .......

    /* m_CarInfo.max_deceleration 对应
       op_local_planner)/launch/op_common_params.launch 的参数 maxDeceleration */

    if(m_CarInfo.max_deceleration != 0)
        pValues->minStoppingDistance = -pow(car_state.speed, 2)/(m_CarInfo.max_deceleration);
    // ...........
    double critical_long_front_distance =  m_CarInfo.wheel_base/2.0 + m_CarInfo.length/2.0 + m_params.verticalSafetyDistance;

    if(ReachEndOfGlobalPath(pValues->minStoppingDistance + critical_long_front_distance, pValues->iCurrSafeLane))
        pValues->currentGoalID = -1;   // 触发 GoalStateII  进入 FINISH_STATE 状态
    else
        pValues->currentGoalID = goalID;

    // ******

}

/*
   ...
*/

bool DecisionMaker::ReachEndOfGlobalPath(const double& min_distance, const int& iGlobalPathIndex)
{
    if(m_TotalPath.size()==0) return false;

    PlannerHNS::RelativeInfo info;
    PlanningHelpers::GetRelativeInfo(m_TotalPath.at(iGlobalPathIndex), state, info);

    double d = 0;
    for(unsigned int i = info.iFront; i < m_TotalPath.at(iGlobalPathIndex).size()-1; i++)
    {
        d+= hypot(m_TotalPath.at(iGlobalPathIndex).at(i+1).pos.y - m_TotalPath.at(iGlobalPathIndex).at(i).pos.y,
                  m_TotalPath.at(iGlobalPathIndex).at(i+1).pos.x - m_TotalPath.at(iGlobalPathIndex).at(i).pos.x);
        if(d > min_distance)  // 停车距离 大于 最小停车距离, 返回 False, -> 正常
        return false;
    }
    return true;  // 停车距离 小于 最小停车距离, 返回 True, -> 最终触发 FINISH_STATE
}
// autoware/common/op_planner/src/BehaviorStateMachine.cpp

BehaviorStateMachine* GoalStateII::GetNextState()
{
    PreCalculatedConditions* pCParams = GetCalcParams();

    if(pCParams->currentGoalID == -1){
        return FindBehaviorState(FINISH_STATE);  // 触发 END 停车状态
    } else
    {
        pCParams->prevGoalID = pCParams->currentGoalID;
        return FindBehaviorState(FORWARD_STATE);
    }
}