科学上网
一枝红杏出墙来!!!

VPS厂商
快速搭建
方案1(未加速)
$ curl -sSL https://get.docker.com/ | sh

# server
$ sudo firewall-cmd --zone=public --add-port=8500/udp --permanent  # 开启服务端 端口

$ docker run -d --restart=always --name ssserver -p 6443:6443 mritd/shadowsocks -s "-s 0.0.0.0 -p 6443 -m aes-256-cfb -k rootroot --fast-open"

# client
$ docker run -d --restart=always --name ssclient -p 1080:1080 mritd/shadowsocks \
  -m "ss-local" -s "-s $SSSERVER_IP -p 6443 -b 0.0.0.0 -l 1080 -m aes-256-cfb -k rootroot --fast-open"
方案2 (kcptun 加速,24小时内 被封)
# server
$ sudo firewall-cmd --zone=public --add-port=8500/udp --permanent  # 开启服务端 端口
$ sudo docker run -d --restart=always --name ssserver -p 6443:6443 -p 8500:8500/udp mritd/shadowsocks \
  -m "ss-server" -s "-s 0.0.0.0 -p 6443 -m aes-256-cfb -k meiyoumima --fast-open -n 5 " \
  -x -e "kcpserver" -k "-t 127.0.0.1:6443 -l :8500 -mode fast2"

# client
$ sudo docker run -d --restart=always --name ssclient -p 1080:1080 mritd/shadowsocks \
  -m "ss-local" -s "-s 127.0.0.1 -p 8500 -b 0.0.0.0 -l 1080 -m aes-256-cfb -k meiyoumima --fast-open" \
  -x -e "kcpclient" -k "-r $SSSERVER_IP:8500 -l :8500 -mode fast2"
方案3 Udp2raw-tunnel
# ssserver
docker run -d --restart=always --name ssserver -p 6443:6443 mritd/shadowsocks -s "-s 0.0.0.0 -p 6443 -m aes-256-cfb -k rootroot --fast-open"

# kcptun server
./server_linux_amd64 -t "0.0.0.0:6443" -l ":4000" -mode fast2  -mtu 1200

# hudp2raw server
./udp2raw_amd64 -s -l 0.0.0.0:2096 -r 0.0.0.0:4000 -k "passwd:meiyoumima" --raw-mode faketcp -a


####-------- G -- F -- W  -------####

# hudp2raw client
./udp2raw_amd64 -c -r $SERVER_IP:2096 -l 0.0.0.0:4000 --raw-mode faketcp -a -k "passwd:meiyoumima"


# kcptun client
./client_linux_amd64  -r "0.0.0.0:4000" -l ":8388" -mode fast2 -mtu 1200

# ssclient
sudo docker run -d  --name ssclient -p 1081:1080 mritd/shadowsocks -m "ss-local" -s "-s 192.168.2.3 -p 8388 -b 0.0.0.0 -l 1080 -m aes-256-cfb -k rootroot --fast-open"
1. 牛逼的shadowsocks
安装 shadowsocks
# ubuntu
$ export LC_ALL=C
$ sudo apt-get install python-pip

$ sudo pip install --upgrade pip -i https://pypi.mirrors.ustc.edu.cn/simple
$ sudo pip install shadowsocks  -i https://pypi.mirrors.ustc.edu.cn/simple
配置 shadowsocks
Server
#  1. 手动启动

$ sudo ssserver -p 8388 -k password -m aes-256-cfb --user nobody -d start

# 2. 配置自动启动(ubuntu)
$ sudo tee /etc/shadowsocks.json <<-'EOF'
{
    "server":"my_server_ip",
    "server_port":8388,
    "local_address": "127.0.0.1",
    "local_port":1080,
    "password":"mypassword",
    "timeout":300,
    "method":"aes-256-cfb",
    "fast_open": false,
    "workers": 100
}
EOF

$ sudo tee /etc/init.d/shadowsocks-start.sh <<-'EOF'
#! /bin/sh
### BEGIN INIT INFO
# Provides:          shadowsocks
# Required-Start:    $remote_fs $syslog
# Required-Stop:     $remote_fs $syslog
# Should-Start:      $network $time
# Should-stop:       $network $time
# Default-Start:     2 3 4 5
# Default-Stop:      0 1 6
# Short-Description: shadowsocks.
### END INIT INFO
/usr/local/bin/ssserver -c /etc/shadowsocks.json -d start
EOF

# 设置启动等级:
$ sudo chmod a+x /etc/init.d/shadowsocks-start.sh
$ sudo update-rc.d shadowsocks-start.sh defaults 90

$ service shadowsocks-start.sh start/stop/restart
Client
- Ubuntu
$ sudo tee /etc/shadowsocks.json <<-'EOF'
{
    "server":"my_server_ip",
    "server_port":8388,
    "local_address": "127.0.0.1",
    "local_port":1080,
    "password":"mypassword",
    "timeout":300,
    "method":"aes-256-cfb",
    "fast_open": true,
    "workers": 100
}
EOF

# workers - 并发数

# 手动启动,停止
$ sudo sslocal -c /etc/shadowsocks.json
$ sudo sslocal -c /etc/shadowsocks.json -d start
$ sudo sslocal -c /etc/shadowsocks.json -d stop
$ sudo sslocal -c /etc/shadowsocks.json -d restart

# 配置开机自启动
$ sudo tee /etc/init.d/shadowsocks-start.sh <<-'EOF'
#!/bin/sh
### BEGIN INIT INFO
# Provides:          shadowsocks
# Required-Start:    $remote_fs $syslog
# Required-Stop:     $remote_fs $syslog
# Should-Start:      $network $time
# Should-stop:       $network $time
# Default-Start:     2 3 4 5
# Default-Stop:      0 1 6
# Short-Description: shadowsocks.
### END INIT INFO
/usr/local/bin/sslocal -c /etc/shadowsocks.json -d start
EOF

# 设置启动等级:
$ sudo chmod a+x /etc/init.d/shadowsocks-start.sh
$ sudo update-rc.d shadowsocks-start.sh defaults 90

# 测试
$ google-chrome --proxy-server=socks5://127.0.0.1:1080
参考
kcptun 加速
| 属性 | 客户端 | 服务器 |
|---|---|---|
| listener_port | 与shadowsocks交互的端口 | 对外的端口 |
| target_ip | 服务器的IP | 本机 |
| target_port | 服务器的端口(listen_port) | 与shadowsocks交互的端口 |
2. 神奇的SwitchyOmega
配置代理

配置自动切换
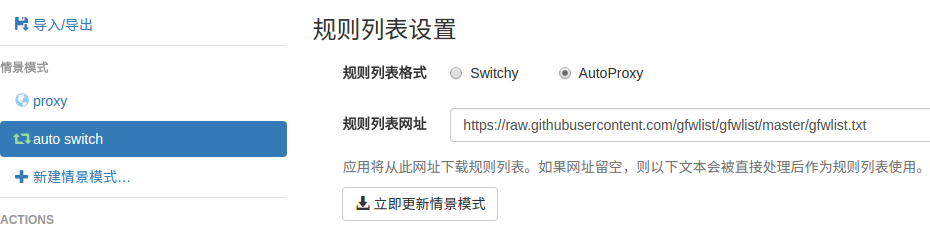
导入在线,规则列表,立即更新情景模式
在线规则列表:
https://raw.githubusercontent.com/gfwlist/gfwlist/master/gfwlist.txt
3. polipo http/https的代理转发
Shadowsocks是我们常用的代理工具,它使用socks5协议,而终端很多工具目前只支持http和https等协议,对socks5协议支持不够好, 所以需要将socks协议转换成http协议.
# ubuntu
$ sudo apt-get install polipo
$ sudo polipo -v
$ man polipo
# the default values.  See /usr/share/doc/polipo/examples/config.sample

# mac
$ brew  search polipo
$ sudo mkdir /etc/polipo
$ sudo tee /etc/polipo/config <<-'EOF'

# This file only needs to list configuration variables that deviate
# from the default values.  See /usr/share/doc/polipo/examples/config.sample
# and "polipo -v" for variables you can tweak and further information.

logSyslog = true
logFile = /var/log/polipo/polipo.log

socksParentProxy = "127.0.0.1:1080"
socksProxyType = socks5

proxyAddress = "0.0.0.0"
proxyPort = 8123
allowedClients = 127.0.0.1, ::1, 192.168.8.0/24

EOF

# ubuntu
$ sudo service polipo restart

# mac
$ sudo mkdir /var/log/polipo
$ sudo polipo socksParentProxy=localhost:1080
socksParentProxy : 上级代理ip,端口
socksProxyType   : 是上级代理类型

proxyAddress     : 监听的ip
proxyPort        : 是本地监听端口
allowedClients   : 是允许连接ip范围
# 以ubuntu 测试通过
echo -e "\n------------------------------------------\n"
curl ip.gs
#curl ifconfig.me
echo -e "\n------------------------------------------\n"

export https_proxy=https://127.0.0.1:8123
export  http_proxy=http://127.0.0.1:8123
export HTTPS_PROXY=https://127.0.0.1:8123
export  HTTP_PROXY=http://127.0.0.1:8123

curl ip.gs
#curl ifconfig.me
echo -e "\n------------------------------------------\n"

$ git config --global http.proxy=localhost:8123
4. 端口转发
- 内网渗透之端口转发与代理工具总结:
- https://www.freebuf.com/articles/web/170970.html
- https://github.com/Brucetg/Pentest-tools.git
- /home/promote/Documents/Pentest-tools/端口转发
#端口转发
lcx.exe -slave 192.168.8.6 8888 127.0.0.1 9666
lcx.exe -listen  8888 8889  #将 8888 转发到 8889

## 代理
lcx.exe -tran 8889 127.0.0.1 9666


## 端口转发示例3
lcx.exe -slave 192.168.8.100 8888 127.0.0.1 9666    # windows  端运行 无界端口 127.0.01:9666
./portmap -m 2 -p1 8889 -h2  192.168.8.100 -p2 8888   # Linux端(192.168.8.100)  ,上网配置 8889


## 待研究: https://www.freebuf.com/articles/network/244567.html
ssh -L 1080:127.0.0.1:1080 192.168.3.19
ssh -L 1089:127.0.0.1:1089 promote@192.168.3.19
内网穿透 tailscaled
################################################################
# Server: Enable IP forwarding
################################################################

echo 'net.ipv4.ip_forward = 1' | sudo tee -a /etc/sysctl.conf
echo 'net.ipv6.conf.all.forwarding = 1' | sudo tee -a /etc/sysctl.conf
sudo sysctl -p /etc/sysctl.conf

################################################################
# Server : If your Linux node uses firewalld
################################################################

firewall-cmd --permanent --add-masquerade


################################################################
# Server or client
################################################################

docker run  -d --restart=always \
    --name=tailscaled \
    -v /var/lib:/var/lib \
    -v /dev/net/tun:/dev/net/tun \
    --network=host \
    --privileged \
    tailscale/tailscale:v1.26.0 \
    tailscaled


docker exec tailscaled tailscale up --advertise-routes=192.168.3.0/24,192.168.2.0/24 --reset # For Server

docker exec tailscaled tailscale up                  # For Windows , macOS client
docker exec tailscaled tailscale up --accept-routes  # For linux client